I read a lot of blogs and books about felting, and the base seems to be a much debated topic. Some say the base needs to be wool, other say you can use doll stuffing. Some say they use wire armature, other’s say wire is not required at all. Here is what I do, penny pinching the whole way…
Step 1.
Start with chenille stems, also known as pipe cleaners. I buy mine from any craft store that I can use a coupon to get them 40% off. It’s easier to cover them if the end color is similar. So for black or dark green creatures I use black stems, or for example if my finishing color is yellow I’ll use white stems. Really any color will do, because we plan to cover it up! Bend the fuzzy wire into the basic bones of any 3D sculpture you wish to create (it’s okay if it’s super flimsy), then move on to step two.
Step 2.
You can use original Poly-fil brand Fiber Fill, however I prefer the very slightly more expensive doll stuffing: Poly-fil brand, “Crafter’s Choice, Dry Polyester Packing”. A word of caution, if you get pillow stuffing that is too luxury it will NOT function at all as a core. Wrap some of the stuffing around your wire base, and start felting it into itself. This will work with any needle, but a single course needle, sized 36 or 36star, will perform best.
Step 3.
Use a sharpie to mark out patterns before you start, then adding colored fiber is as simple as shading in a coloring page!

OPTIONAL:
Magnets & Glue
I primarily make shoulder dragons, so I use Goop to glue two super strong Earth Magnets to the bottom of the dragon. I’ve tried several glue options, and Goop is the only one to hold up to actual use. For the wearable invisible shoulder base I sew a metal washer (from Home Depot), into a muslin cotton cover. To wear the dragon simply take the small cloth base and slip it just barely out of sight along the top of your shoulder under your clothing. Tighter clothing will hold the base in place better. Place the dragon on top of the base, the magnets will attach to the base. Play around with the placement of the base in a mirror until the dragon sits upright. When removing it’s best to slide it off, rather than pull.
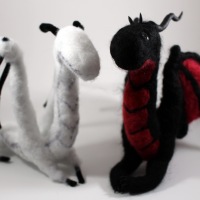
One of the dragon styles I’ve made is below, for more photos click here: Toren


 The wings for these dragons have caused me no end of trouble. I’ve tried beading wire, sewn fabric wings, glued fabric wings, purchased sheets of felt, wet felted flat pieces, dry felting flat pieces. In the end it was felting my own flat pieces in the coordinating color that worked the best. I roll some fluffing up and CAREFULLY begin felting it into itself. When I’ve got a shape that will fit into the wing, I felted the piece into the wing, along the edge of the already felted chenille stem base. This is where I still hurt myself with sharp barbed felting needles, but what is a dragon with no wings? The sacrifice is worth it!
 Felted eyes can be gorgeous, but sadly I don’t have that skill. On a happier note, I adore the look of basic black doll eyes! I order them from amazon in a mixed set of
 There are many sizes of needles, and they each have different uses. I’ll leave it to my fellow WordPress blogger over at
 researching different types of fiber people use for felting, yet it always came back to wool. Luckily right near the moment I was going to give up, I ran across a video of girl using a cat scratcher to shred regular yarn for use in needle felting. It was a eureka moment! I have boxes of yarn! I tried the method, and… it worked!! You really need to really put force into it, but I only use yarn now, because it has worked better than wool for every project I wanted to make. You can watch the video here: